重磅: 利用 req 统一为 Golang 所有 HTTP 请求集成链路追踪
概述
为了增强 Golang 程序的可观测性,方便定位问题,我们往往会在代码中集成链路追踪 (tracing) 的能力,Jaeger 是当今比较主流的选择,而 tracing 相关的 API 如今都抽象到了 OpenTelemetry 项目中,涵盖各种实现,也包括 Jaeger 在内。
利用 req 强大的中间件能力,可以轻松为我们涉及 HTTP 调用的代码统一集成链路追踪的能力,且能以最少的代码量进行扩展。
本文将给出一个可运行的程序示例:输入一个 GitHub 用户名,展示用户的简短介绍,包含名字、网站地址以及该用户下的最火开源项目与 star 数量,期间涉及的函数与 API 调用链路追踪信息均上报至 Jaeger,进行可视化展示。
主要包含以下特点:
- 内置一个基于 req 封装的 GitHub SDK。
- SDK 中利用 req 的
RequestMiddleware与ResponseMiddleware,统一处理 API 异常,对接 API 的实现函数无需关心错误处理。 - SDK 支持传入 OpenTelemetry 的 Tracer 来开启链路追踪,利用 req 的 Client 中间件能力,在请求前创建 trace span,并记录请求与响应的详细信息到 span 中(URL、Method、请求头、请求体、响应状态码、响应头、响应体等),在响应结束后自动终止 span。
- 在调用 SDK 的上层函数也使用 trace,层层传递,在 Jaeger UI 上可查看完整且非常详细的调用链路详情。
初始化项目
首先创建一个目录,使用 go mod init 初始化工程:
go mod init opentelemetry-jaeger-tracing
封装支持 Tracing 的 GitHub SDK
在项目根目录下面创建一个名为 github 的目录,作为内置的 GitHub SDK 的 package,在里面创建源文件 github.go,写入代码:
package github

import (
  "context"
  "fmt"
  "github.com/imroc/req/v3"
  "go.opentelemetry.io/otel/attribute"
  "go.opentelemetry.io/otel/codes"
  "go.opentelemetry.io/otel/trace"
  "strconv"
  "strings"
)

// Client is the go client for GitHub API.
type Client struct {
  *req.Client
}

// APIError represents the error message that GitHub API returns.
// GitHub API doc: https://docs.github.com/en/rest/overview/resources-in-the-rest-api#client-errors
type APIError struct {
  Message          string `json:"message"`
  DocumentationUrl string `json:"documentation_url,omitempty"`
  Errors           []struct {
    Resource string `json:"resource"`
    Field    string `json:"field"`
    Code     string `json:"code"`
  } `json:"errors,omitempty"`
}

// Error convert APIError to a human readable error and return.
func (e *APIError) Error() string {
  msg := fmt.Sprintf("API error: %s", e.Message)
  if e.DocumentationUrl != "" {
    return fmt.Sprintf("%s (see doc %s)", msg, e.DocumentationUrl)
  }
  if len(e.Errors) == 0 {
    return msg
  }
  errs := []string{}
  for _, err := range e.Errors {
    errs = append(errs, fmt.Sprintf("resource:%s field:%s code:%s", err.Resource, err.Field, err.Code))
  }
  return fmt.Sprintf("%s (%s)", msg, strings.Join(errs, " | "))
}

// NewClient create a GitHub client.
func NewClient() *Client {
  c := req.C().
    // All GitHub API requests need this header.
    SetCommonHeader("Accept", "application/vnd.github.v3+json").
    // All GitHub API requests use the same base URL.
    SetBaseURL("https://api.github.com").
    // EnableDump at the request level in request middleware which dump content into
    // memory (not print to stdout), we can record dump content only when unexpected
    // exception occurs, it is helpful to troubleshoot problems in production.
    OnBeforeRequest(func(c *req.Client, r *req.Request) error {
      if r.RetryAttempt > 0 { // Ignore on retry, no need to repeat EnableDump.
        return nil
      }
      r.EnableDump()
      return nil
    }).
    // Unmarshal response body into an APIError struct when status >= 400.
    SetCommonError(&APIError{}).
    // Handle common exceptions in response middleware.
    OnAfterResponse(func(client *req.Client, resp *req.Response) error {
      if resp.Err != nil { // There is an underlying error, e.g. network error or unmarshal error(SetResult or SetError was invoked before).
        if dump := resp.Dump(); dump != "" { // Append dump content to original underlying error to help troubleshoot.
          resp.Err = fmt.Errorf("%s\nraw content:\n%s", resp.Err.Error(), resp.Dump())
        }
        return nil // Skip the following logic if there is an underlying error.
      }
      if err, ok := resp.Error().(*APIError); ok { // Server returns an error message.
        // Convert it to human-readable go error.
        resp.Err = err
        return nil
      }
      // Corner case: neither an error response nor a success response,
      // dump content to help troubleshoot.
      if !resp.IsSuccess() {
        resp.Err = fmt.Errorf("bad response, raw content:\n%s", resp.Dump())
      }
      return nil
    })

  return &Client{
    Client: c,
  }
}
- 使用
Client结构体作为 GitHub 的客户端,也是 SDK 的核心结构体,内置了一个*req.Client。 - 分别使用
SetCommonHeader与SetBaseURL为 GitHub 所有 API 请求设置统一的Accept请求头与 URL 前缀。 - GitHub API 响应的错误格式是统一的,使用
SetCommonError告知 req 如果响应了错误(状态码大于等于400),则自动将响应体 Unmarshal 到APIError结构体的对象中。 APIError结构体实现了 go 的 error 接口,将 API 层面的错误信息转换成可读的字符串。- 在
OnAfterResponse中设置ResponseMiddleware,检测到 API 响应错误时,将其写入到resp.Err,自动会将其作为 go error 抛给上层的调用方。 - 在
OnBeforeRequest中设置RequestMiddleware,为所有请求开启请求级别的 dump (暂存到内存,不打印出来),若遇到底层错误(如超时、dns 解析失败、Unmarshal 失败),或者收到未知的状态码(小于200),在ResponseMiddleware中尽可能将有助于定位问题的信息(dump 内容)记录到 error,写入resp.Err以便抛给上层的调用方。
下面为 Client 增加 Tracing 的能力:
type apiNameType int

const apiNameKey apiNameType = iota

// SetTracer set the tracer of opentelemetry.
func (c *Client) SetTracer(tracer trace.Tracer) {
    c.WrapRoundTripFunc(func(rt req.RoundTripper) req.RoundTripFunc {
        return func(req *req.Request) (resp *req.Response, err error) {
            ctx := req.Context()
            apiName, ok := ctx.Value(apiNameKey).(string)
            if !ok {
                apiName = req.URL.Path
            }
            _, span := tracer.Start(req.Context(), apiName)
            defer span.End()
            span.SetAttributes(
                attribute.String("http.url", req.URL.String()),
                attribute.String("http.method", req.Method),
                attribute.String("http.req.header", req.HeaderToString()),
            )
            if len(req.Body) > 0 {
                span.SetAttributes(
                    attribute.String("http.req.body", string(req.Body)),
                )
            }
            resp, err = rt.RoundTrip(req)
            if err != nil {
                span.RecordError(err)
                span.SetStatus(codes.Error, err.Error())
            }
            if resp.Response != nil {
                span.SetAttributes(
                    attribute.Int("http.status_code", resp.StatusCode),
                    attribute.String("http.resp.header", resp.HeaderToString()),
                    attribute.String("http.resp.body", resp.String()),
                )
            }
            return
        }
    })
}
- 在
Client.SetTracer中传入 OpenTelemetry 的 Tracer 来开启 Tracing 能力。 - 调用
Client中内置的*req.Client的WrapRoundTripFunc添加 Client 中间件,确保将rt.RoundTrip(req)返回的 resp 和 err 最终返回给上层。该行代码之前是发起请求前,可记录请求信息,之后是收到响应后,可记录响应信息。 - 在中间件实现函数里,为每个请求创建一个 trace span,从 context 中获取 API 名称作为 span 名称,如果 context 中有 parant span,当前 span 也会自动成为其 child span。
- 使用
defer span.End()确保在响应结束后再结束 span,以便 tracing 能够正确统计耗时。 - 将请求与响应的详细信息全都记录到 span 中,如 URL、Method、请求头、请求体、响应状态码、响应头、响应体等。
- 如果检测到 error,也记录到 span 中并设置 span 的 error 状态。
下面开始对接 GitHub API,第一个实现的是获取 GitHub 用户信息的 API,方法命名为 GetUserProfile:
func withAPIName(ctx context.Context, name string) context.Context {
	if ctx == nil {
		ctx = context.Background()
	}
	return context.WithValue(ctx, apiNameKey, name)
}

type UserProfile struct {
	Name string `json:"name"`
	Blog string `json:"blog"`
}

// GetUserProfile returns the user profile for the specified user.
// Github API doc: https://docs.github.com/en/rest/users/users#get-a-user
func (c *Client) GetUserProfile(ctx context.Context, username string) (user *UserProfile, err error) {
	err = c.Get("/users/{username}").
		SetPathParam("username", username).
		SetResult(&user).
		Do(withAPIName(ctx, "GetUserProfile")).Err
	return
}
- 链路追踪的 span 都是通过 context 传递,每个方法的第一个参数都用 context。
- 利用链式调用构造 Request,
Get表示创建一个GET请求,并传入 API 路径(之前Client.SetCommonBaseURL已设置所有请求的 URL 前缀,这里就可以省略前缀只写路径), 路径中还有username路径参数 (REST 风格 API),使用SetPathParam传入。 - 响应体格式是
UserProfile结构体,直接将返回参数中的空指针变量的地址传入SetResult,表示如果没有异常,自动创建一个该结构��体类型的对象,并让指针变量指向该结构体,这样都不需要自己事先初始化结构体,减少代码量。 - 利用公共函数
withAPIName将 API 名称放入 context,然后调用Do发起请求时,将 context 传进去,以便让 Client 中间件能够获取到 API 名称并自动将其作为 span 名称。 Do会返回*req.Response,任何情况它都不为 nil,如果请求过程中返回了 error,会记录到其Err字段,将其赋值给返回参数的err以便 error 能够层层传递上去。
下面再来增加一个获取指定用户代码仓库列表的 API ListUserRepo:
type Repo struct {
    Name string `json:"name"`
    Star int    `json:"stargazers_count"`
}

// ListUserRepo returns a list of public repositories for the specified user
// Github API doc: https://docs.github.com/en/rest/repos/repos#list-repositories-for-a-user
func (c *Client) ListUserRepo(ctx context.Context, username string, page int) (repos []*Repo, err error) {
    err = c.Get("/users/{username}/repos").
        SetPathParam("username", username).
        SetQueryParamsAnyType(map[string]any{
            "type":      "owner",
            "page":      page,
            "per_page":  "100",
            "sort":      "updated",
            "direction": "desc",
        }).
        SetResult(&repos).
        Do(withAPIName(ctx, "ListUserRepo")).Err
    return
}
- 该 API 支持分页,需要传入 username 和 page。
- page 是整数类型,需要将其入查询参数,使用
SetQueryParamsAnyType传入所有查询参数,无需提前转成字符串。 - 其余与上一个 API 实现类似。
可以看到,后续我们每次对接新的 API 都变得非常轻松,因为利用了 req 的中间件能力,对异常与链路追踪都进行了统一处理,对接 API 时,只需传入 API 必要的参数与响应体结构类型即可,没有一点多余的代码,非常直观和简洁。
好了,作为示例我们就只对接这两个 API 就够了,我们还可以再为 Client 增加一些实用的小功能:
// LoginWithToken login with GitHub personal access token.
// GitHub API doc: https://docs.github.com/en/rest/overview/other-authentication-methods#authenticating-for-saml-sso
func (c *Client) LoginWithToken(token string) *Client {
	c.SetCommonHeader("Authorization", "token "+token)
	return c
}

// SetDebug enable debug if set to true, disable debug if set to false.
func (c *Client) SetDebug(enable bool) *Client {
	if enable {
		c.EnableDebugLog()
		c.EnableDumpAll()
	} else {
		c.DisableDebugLog()
		c.DisableDumpAll()
	}
	return c
}
- 如果是匿名用户调用 GitHub API,会有限频,可以使用 token 来避免被限频,增加
LoginWithToken以支持为所有请求带上认证的 personal access token。 - 增加
SetDebug以支持 debug 能力,开启 debug 时,将打印 req 的 debug 日志以及原始的请求与响应内容。
至此,我们的 GitHub SDK 封装完成。
程序示例
下面,正式开始写可运行的示例程序。
在项目根目录下创建 main.go:
package main

import (
	"context"
	"fmt"
	"go.opentelemetry.io/otel"
	"go.opentelemetry.io/otel/attribute"
	"go.opentelemetry.io/otel/codes"
	"go.opentelemetry.io/otel/exporters/jaeger"
	"go.opentelemetry.io/otel/sdk/resource"
	"go.opentelemetry.io/otel/sdk/trace"
	semconv "go.opentelemetry.io/otel/semconv/v1.12.0"
	"log"
	"opentelemetry-jaeger-tracing/github"
	"os"
)

const serviceName = "github-query"

var githubClient *github.Client
- 定义
serviceName作为本服务的标识 (通常每个程序都是一个服务,上报 tracing 数据时,需标识服务名),这里就定义为github-query。 - 本示例程序需要调用 GitHub API 进行查询,使用前面我们封装的 GitHub SDK 作为 client,这里定义一个全局
githubClient变量,内部函数直接使用该 client 进行调用。
使用 OpenTelemetry 进行链路追踪,需要创建一个 TracerProvider,这里我们定义 traceProvider 函数来创建包含 Jaeger 实现的 TracerProvider:
func traceProvider() (*trace.TracerProvider, error) {
	// Create the Jaeger exporter
	ep := os.Getenv("JAEGER_ENDPOINT")
	if ep == "" {
		ep = "http://localhost:14268/api/traces"
	}
	exp, err := jaeger.New(jaeger.WithCollectorEndpoint(jaeger.WithEndpoint(ep)))
	if err != nil {
		return nil, err
	}

	// Record information about this application in a Resource.
	res, _ := resource.Merge(
		resource.Default(),
		resource.NewWithAttributes(
			semconv.SchemaURL,
			semconv.ServiceNameKey.String(serviceName),
			semconv.ServiceVersionKey.String("v0.1.0"),
			attribute.String("environment", "test"),
		),
	)

	// Create the TraceProvider.
	tp := trace.NewTracerProvider(
		// Always be sure to batch in production.
		trace.WithBatcher(exp),
		// Record information about this application in a Resource.
		trace.WithResource(res),
		trace.WithSampler(trace.AlwaysSample()),
	)
	return tp, nil
}
- 使用
JAEGER_ENDPOINT自定义 Jaeger 地址,默认使用本地测试的地址。 - 传入
serviceName以便在 tracing 数据对本服务进行标识。
下面来写查询用户信息的主要函数 QueryUser:
// QueryUser queries information for specified GitHub user, and display a
// brief introduction which includes name, blog, and the most popular repo.
func QueryUser(username string) error {
	ctx, span := otel.Tracer("query").Start(context.Background(), "QueryUser")
	defer span.End()

	span.SetAttributes(
		attribute.String("query.username", username),
	)
	profile, err := githubClient.GetUserProfile(ctx, username)
	if err != nil {
		span.RecordError(err)
		span.SetStatus(codes.Error, err.Error())
		return err
	}
	span.SetAttributes(
		attribute.String("query.name", profile.Name),
		attribute.String("result.blog", profile.Blog),
	)
	repo, err := findMostPopularRepo(ctx, username)
	if err != nil {
		span.RecordError(err)
		span.SetStatus(codes.Error, err.Error())
		return err
	}
	span.SetAttributes(
		attribute.String("popular.repo.name", repo.Name),
		attribute.Int("popular.repo.star", repo.Star),
	)
	fmt.Printf("The most popular repo of %s (%s) is %s, with %d stars\n", profile.Name, profile.Blog, repo.Name, repo.Star)
	return nil
}

func findMostPopularRepo(ctx context.Context, username string) (repo *github.Repo, err error) {
	ctx, span := otel.Tracer("query").Start(ctx, "findMostPopularRepo")
	defer span.End()

	for page := 1; ; page++ {
    var repos []*github.Repo
		repos, err = githubClient.ListUserRepo(ctx, username, page)
		if err != nil {
			return
		}
		if len(repos) == 0 {
			break
		}
		if repo == nil {
			repo = repos[0]
		}
		for _, rp := range repos[1:] {
			if rp.Star >= repo.Star {
				repo = rp
			}
		}
		if len(repos) == 100 {
			continue
		}
		break
	}

	if repo == nil {
		err = fmt.Errorf("no repo found for %s", username)
	}
	return
}
QueryUser需传入一个 username,以便查询指定 GitHub 用户的信息。- 在函数开头创建一个名为
QueryUser的 root span,作为链路追踪的初始 span。 - 在 span 中记录查询相关信息,包含查询的 username 以及查询到的昵称、blog 地址(使用 GetUserProfile 接口),也包含该用户最火的开源项目及其 star 数量(使用 ListUserRepo 接口并进行计算对比得出)。
- 在函数末尾打印最终查询到的信息到控制台。
- 其中计算用户最火开源项目及其 star 数量由单独的
findMostPopularRepo函数来实现,该函数也有对应的 span。
主要的实现函数准备就绪,现在我们来写 main 函数:
func main() {
    tp, err := traceProvider()
    if err != nil {
        panic(err)
    }
    otel.SetTracerProvider(tp)

    githubClient = github.NewClient()
    if os.Getenv("DEBUG") == "on" {
        githubClient.SetDebug(true)
    }
    if token := os.Getenv("GITHUB_TOKEN"); token != "" {
        githubClient.LoginWithToken(token)
    }
    githubClient.SetTracer(otel.Tracer("github"))

    sigs := make(chan os.Signal, 1)
    signal.Notify(sigs, syscall.SIGTERM, syscall.SIGINT)
    go func() {
        sig := <-sigs
        fmt.Printf("Caught %s, shutting down\n", sig)
        if err := tp.Shutdown(context.Background()); err != nil {
            log.Fatal(err)
        }
        os.Exit(0)
    }()

    for {
        var name string
        fmt.Printf("Please give a github username: ")
        _, err := fmt.Fscanf(os.Stdin, "%s\n", &name)
        if err != nil {
            panic(err)
        }
        err = QueryUser(name)
        if err != nil {
            fmt.Println(err.Error())
        }
    }
}
- 调用
traceProvider()创建一个TraceProvider,并使用otel.SetTracerProvider(tp)设置到全局共享,以便前面其它函数调用otel.Tracer(xx)能够使用此 provider 来创建与获取 tracer。 - 调用
github.NewClient()为全局的githubClient进行初始化。 - 判断环境变量,如果
DEBUG=on则开启 Debug,如果提供GITHUB_TOKEN则将其设置给所有请求。 - 使用
githubClient.SetTracer(otel.Tracer("github"))来为 GitHub 的 Client 启用 Tracing 能力,用名为gihtub的 tracer 标识 SDK 中产生的 tracing 信息。 - 处理
SIGTERM和SIGTNT信号以实现优雅终止,在程序退出前关闭TraceProvider,确保 trace 数据上报完再退出 (如果程序不是常驻运行,可以在 main 函数中用 defer 语句关闭TraceProvider)。 - 主体是一个 for 死循环: 获取用户输入的 username,然后调用
QueryUser查询并展示用户信息。
大功告成,下面我们来运行一下看看效果。
运行与效果
首先按照 Jaeger 官方文档 Getting Started 在本地启动一个 Jaeger。
然后在项目根目录运行 go run . 运行程序,输入一个 GitHub 用户名(如 spf13),不出意外的话,会自动展示该用户的简短介绍:
$ go run .
Please give a github username: spf13
The most popular repo of Steve Francia (http://spf13.com) is cobra, with 28044 stars
然后使用浏览器进入 Jaeger UI 界面(http://127.0.0.1:16686/)来查看 Tracing 详情:
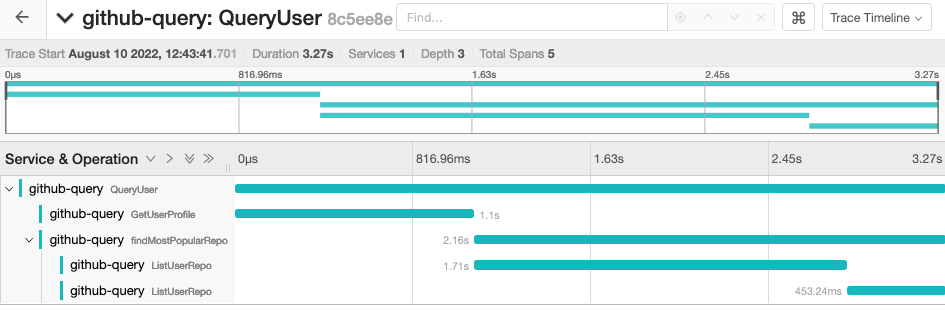
可以清晰的看到函数调用链路与耗时信息:
QueryUser (3.27s)
   |
   |----> GetUserProfile (1.1s)
   |----> findMostPopularRepo (2.16s)
                  |
                  |----> ListUserRepo (1.17s)
                  |----> ListUserRepo (453.24ms)
ListUserRepo调用两次是因为分页查询用户 repo 时一页没查询完,分成了两次查询。
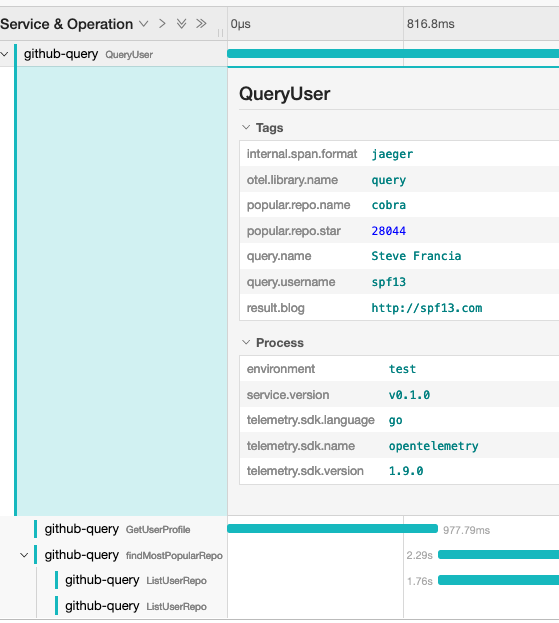
点进 QueryUser 的 span 详情,可以看到我们在函数内记录的查询与结果信息:
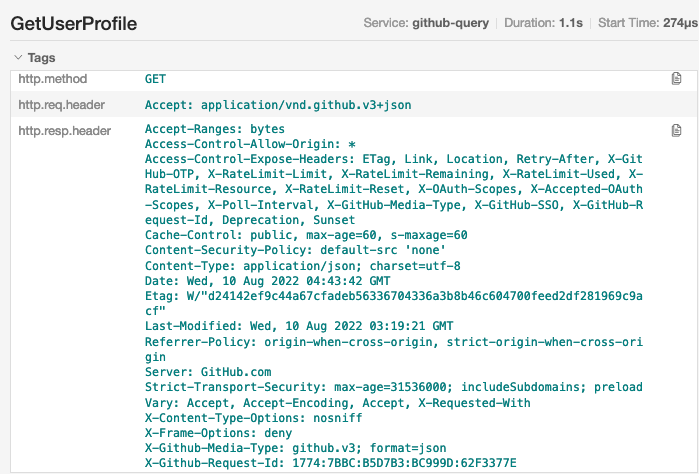
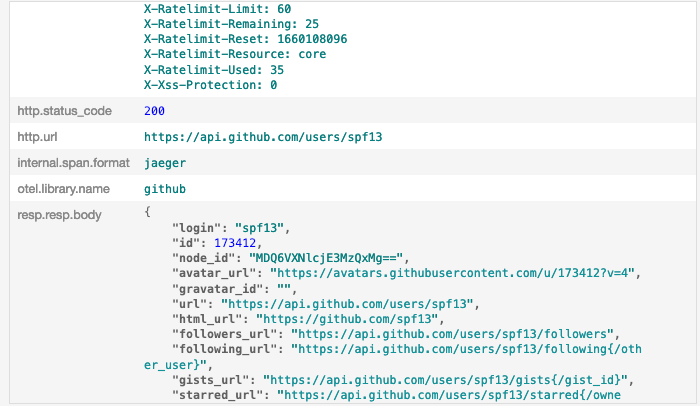
再点进 GetUserProfile 这个 SDK 产生的 span 详情,可以看到我们在中间件统一记录的 URL、Method、请求头、响应状态码、响应头、响应体等信息全都在这里,非常详细:
不断输入其它 username 测试,经过多次后可能会因 GitHub 的 API 限频导致异常:
$ go run .
Please give a github username: spf13
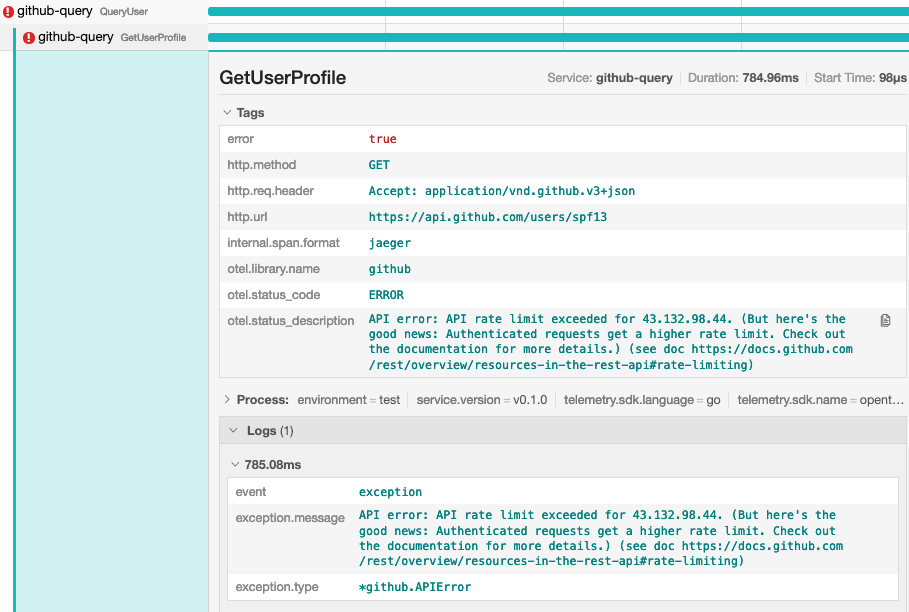
API error: API rate limit exceeded for 43.132.98.44. (But here's the good news: Authenticated requests get a higher rate limit. Check out the documentation for more details.) (see doc https://docs.github.com/rest/overview/resources-in-the-rest-api#rate-limiting)
检查下 Jaeger UI,可以看到很详细很显眼的错误信息:
此时,你可以将你的 GitHub 账号 personal access token 写到环境变量来避免被限频:
export GITHUB_TOKEN=*******
尝试输入一个不存在的用户:
$ go run .
Please give a github username: kjtlejkdglfjsadhfajfsa
API error: Not Found (see doc https://docs.github.com/rest/reference/users#get-a-user)
检查下 Jaeger UI,同样的也可以看到详细的错误信息:

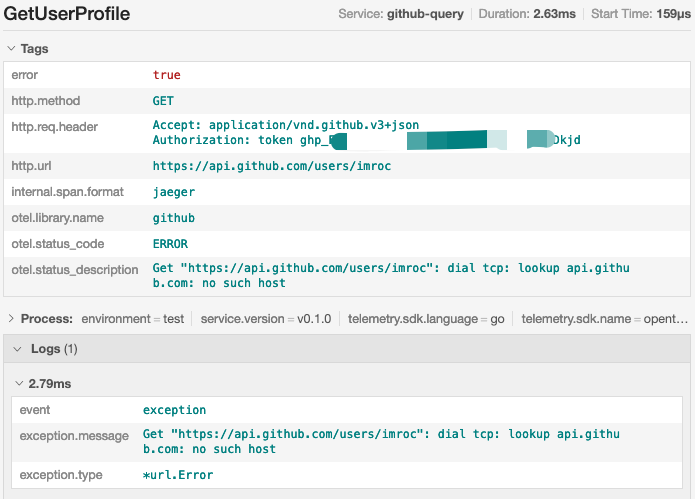
如果断开公网测试,可能会报 dns 解析失败的错:
$ go run .
Please give a github username: imroc
Get "https://api.github.com/users/imroc": dial tcp: lookup api.github.com: no such host
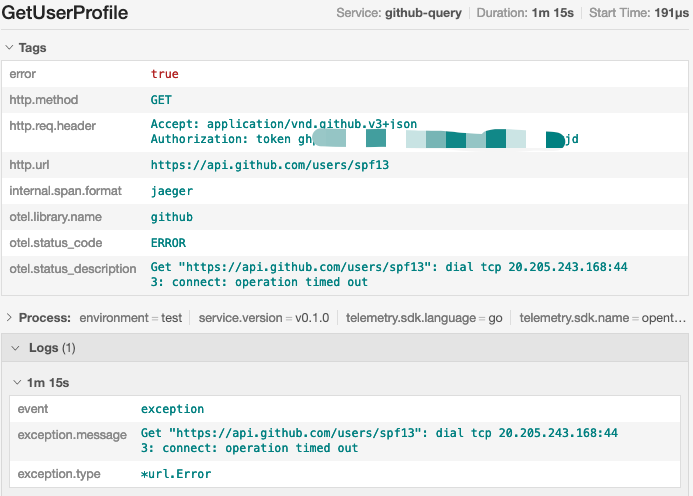
或者连接超时的错:
$ go run .
Please give a github username: spf13
Get "https://api.github.com/users/spf13": dial tcp 20.205.243.168:443: connect: operation timed out
完整代码
本文涉及的完整代码已放入 req 官方 examples 下的 opentelemetry-jaeger-tracing 目录。
总结
如果业务程序中需要调用其它服务的 API,我们可以利用 req 强大的中间件能力,统一处理所有请求的异常,统一记录所有请求详细信息到 Tracing 系统,写出健壮、可观测性强且极易扩展的 SDK 与业务代码。